 D-I-Y Using Pre-Made Graphic Art
When you buy a piece of pre-made graphic art, if the artwork is specifically sized for your kind of project, like a book cover, chances are you won't have to do much to it except add the text to it. However, not all pre-made images are set up like that. Some are set up to accommodate various kinds of projects, from business cards to brochures to posters to book covers to CDs or DVDs. They come in multiple sizes, vertically oriented, horizontally oriented, and sometimes both/neither because they're large and square so you can slip the artwork into a template and use whatever portion of the artwork suits that project.
Most pre-made artwork comes to you as a flattened, rasterized image in .JPG, .TIF, or .PNG format or else as a vector image in.SVG format. There are, of course, many other formats you can get, but, usually you'll get something like this. Occasionally you'll get an editable .PDF.
TEMPLATES
The first thing you're going to need, as mentioned in DIY Graphic Art Help, is a graphics program. Of course, there's Adobe's Creative Suite, but, if looking for free, Gimp is a good choice: www.gimp.org .
The next thing you will need, and you get this from your POD or printer/manufacturer of choice, is the template they want you to use. If it's a book cover, you'll probably get a PDF template labeled with your ISBN. You must use that template. The same is true for any product and project. Whatever company you choose to print the project will have exact specifications for file format, image dimensions, and file size. They will also usually provide you with their template. USE IT.
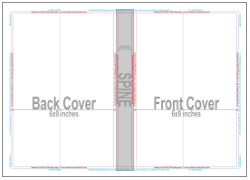
If you haven't yet decided on a printer, you can use a book cover template I've made to help you get started working on designing your book cover. This template is for a 6x9 inch paperback book, such as those published by CreateSpace or Lightning Source.
6 inch x 9 inch book cover template, transparent .PNG 300dpi, 3975px x 2775px
FONTS
You have to use fonts you hold a license to use. The fonts that came with your software packages (Word, Adobe Creative Suite, etc.) and your operating system are licensed. Where you can get in trouble is when you try to use fonts that you find around the Net, then download and install yourself. Make sure you have a license to use the font, specifically a license to use that font for a commercial project...like your book cover.
CHANGING THE ARTWORK
IMPORTANT: Never change your original master file. You might need to go back to the original because you made a mistake. Instead, once you pull the artwork into your graphics program, save the file as a new name.
Color is easy to change. Changing the artwork itself is a little, to a lot, more difficult. First, make sure that the artwork you've bought and downloaded allows you to change it. (Mine does, yes.) If you want to change the color, there are a lot of ways you can easily accomplish that using a good graphics program. To change the artwork itself, you may find it simpler to ask the artist from whom you purchased the artwork to change it. Most of us work in layers, so changing things isn't going to be as hard or time consuming as it will be for you.
CROPPING THE IMAGE
Cropping the artwork to the template: Select the template layer by clicking that layer with your mouse. Using the select tool, select everything outside of the outermost line of the project template. Now, click on the layer with the artwork. Find the "clear" command, which will erase everything selected on that layer. Another way is to use a mask, but I don't want to try to explain masks. For that, go to a tutorial on how-to specific to the graphics program you're using.
RESIZING THE IMAGE
You can resize down, but, to resize down a lot, you'll have to sharpen the image as you reduce its size. Using "unsharp mask" is the best way, but most graphics programs have built in auto-sharpening for image reduction using that command in the software.
Resizing UP is a different problem, altogether. You can enlarge a bit...and I mean a bit if you are starting with a high quality image. You cannot enlarge a lot, though. You cannot double the size of an image, in other words, not unless you have special software, and, even then, it's tough to do well. Buy a bigger image if you need a bigger image. Don't try to upsize an existing one, except for tiny percentages (1% larger, 2% larger).
There. That's should get your started, maybe even a bit frustrated. =)
This page was created June 2012 and uploaded on November 1, 2012.

